ONESOURCE
Workpapers Help
Functions: References and Anchoring
If you need help with the basic component and parameter configurations, see Functions: Get or Functions: Set.
Instead of having the Function Wizard insert component or parameter values directly into formulas, you can store these values in workpaper cells. Formulas can look up the values using cell references. The values in these cells are typically numeric reference codes, which represent various components or parameters.
If you do not know the reference codes for your components or parameters, the Function Wizard can insert the reference codes into the cells you specify.
When you set up cell references, you can also use Excel anchors to retain different formula elements when you copy formulas to other cells.
Review the following sections in the order below:
Select Components
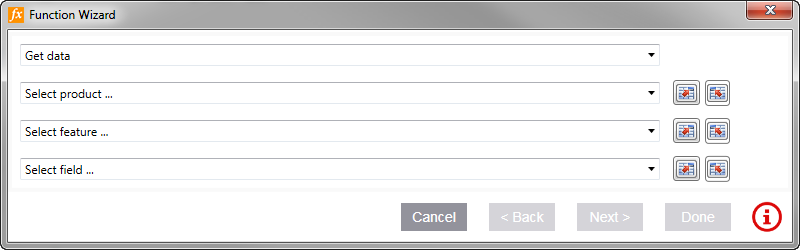
On the first page of the Function Wizard, you select the type of function and then choose various components to identify the data you want. This section explains how to set up cell references to look up these components from your workpaper instead of from the Platform.
The Add-in provides two options for setting up cell references to components in a workpaper:
- Option One: Select Existing Component Values from Workpaper Cells
- Option Two: Copy Component Values from the Function Wizard to Workpaper Cells
Option One: Select Existing Component Values from Workpaper Cells
Use this option if your workpaper already has cells containing component values. With this option, you specify the cell address (for example, A1) that contains the component value. Component values can include the Reference Code, the Name, or both as shown below:
| Component Value | Description |
|---|---|
| Reference Code | A number that identifies ONESOURCE products or features, such as 1, 2, or 3. |
| Name |
The name of the product, feature, etc. Examples include US Income Tax and TA - Tax Adjustments. |
| Reference Code:Name | The reference id and name separated by a colon, such as 1:Tax Provision. |
For example, whether the cell at the address A15 contains 1, Tax Provision, or 1:Tax Provision, the Function Wizard can recognize it.
Complete the following to select existing component values:
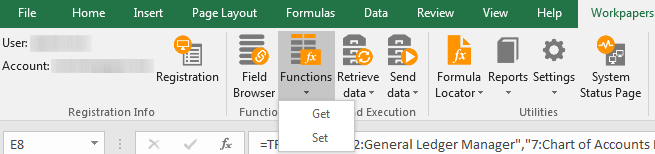
- On the Workpapers tab, select the Functions icon.

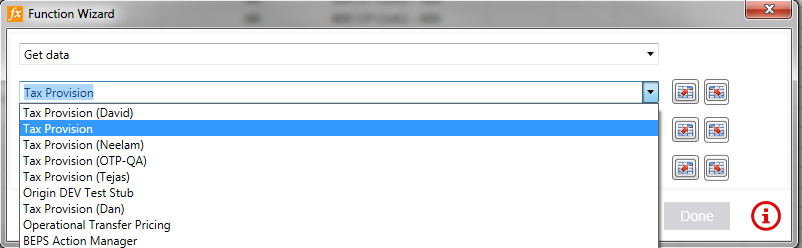
- In the Function Wizard, select Get data or Set Data in the first drop-down list.
-
For a component that needs a reference, select the following icon:
Do not select any values in the drop-down list.

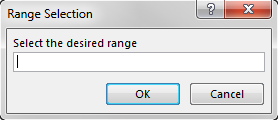
- Enter the cell reference manually, or select the cells in the workpaper, and then select OK.
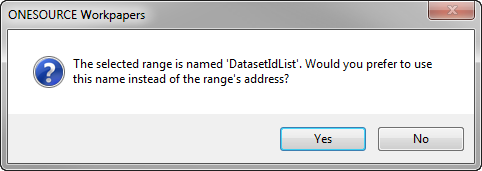
If the selected cell or range has a name, you receive an additional pop-up. Select Yes if you prefer to use cell or range name instead of the cell address.
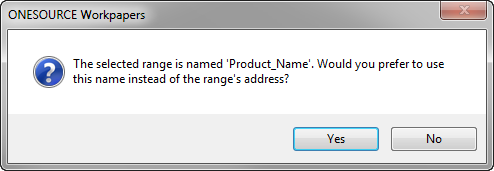
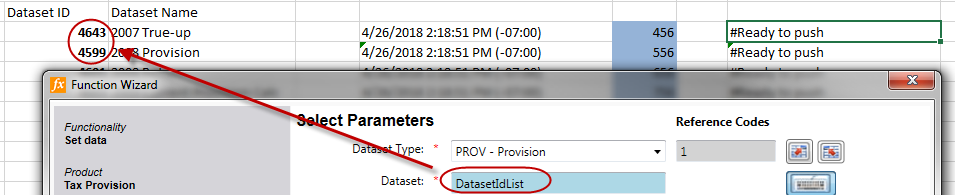
If you refer to names of cells or cell ranges, the name appears in the field instead of the address. Also, the Anchoring check boxes disappear because anchoring is set automatically:

If you decide not to use a reference, select the keyboard icon
 .
. - Do one of the following:
- Set up row and column anchors for the component (see Select Component and Parameter Anchors below).
- Create references for other components.
- Select Next and complete the steps in Configure Parameters.
Option Two: Copy Component Values from the Function Wizard to Workpaper Cells
Use this option to copy the wizard's reference code to a workpaper cell. For example, if you want the formula to look up a component in the workpaper, but you do not know the component's reference code, use this option to copy the reference code from the wizard into the workpaper.
Complete the following to copy component reference codes into workpapers:
- On the Workpapers tab, select the Functions icon.
-
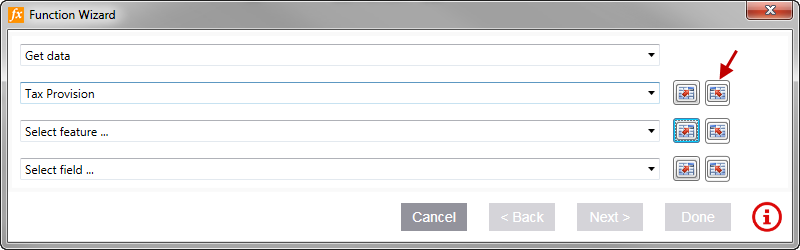
In the Function Wizard, select Get data or Set Data in the first drop-down list.
- Select a value in the drop-down list for the component you want to store in a workpaper cell.
-
Select the following icon to copy the reference code to a workpaper cell:
- Enter the cell reference manually, or select the cells in the workpaper, and then select OK.
If the selected cell or range has a name, you receive an additional pop-up. Select Yes if you prefer to use cell or range name instead of the cell address.
If you refer to names of cells or cell ranges, the name appears in the field instead of the address. Also, the Anchoring check boxes disappear because anchoring is set automatically:
If you decide not to use a reference, select the keyboard icon
. - When you finish selecting components, select Next.
- Remain in the wizard and continue to the next section.
Configure Parameters
On the remaining Function Wizard pages, you can create cell references for formula parameters, and the routine is similar to creating cell references to components.
You can configure workpaper parameters in two ways, depending on whether your workpaper already has parameters listed in cells:
- Option One: Select Existing Parameter Values from Workpaper Cells
- Option Two: Copy Parameter Values from the Function Wizard to Workpaper Cells
Option One: Select Existing Parameter Values from Workpaper Cells
Use this option if your workpaper already has cells containing parameter reference codes. With this option, you specify the cell address (for example, A1) that contains the parameter reference codes.
- Under Select Parameters, select the following icon:
Do not select any values in the parameter drop-down list.

- Enter the cell reference manually, or select the cells in the workpaper, and then select OK.
After you select the cell, the reference code disappears, and the cell address or name is inserted into the formula.

If the selected cell or range has a name, you receive an additional pop-up. Select Yes if you prefer to use cell or range name instead of the cell address.
If you refer to names of cells or cell ranges, the name appears in the field instead of the address. Also, the Anchoring check boxes disappear because anchoring is set automatically:
If you decide not to use a reference, select the keyboard icon
. - Do one of the following:
- Set up row and column anchors (see Select Component and Parameter Anchors below).
- Create references for other parameters in Selected Parameters.
- Select Next and complete the remaining steps in the Function Wizard.
Option Two: Copy Parameter Values from the Function Wizard to Workpaper Cells
Use this option to create a new parameter value by copying the wizard's reference code to a workpaper cell.
- Under Select Parameters, select a value in the drop-down list for the parameter you want to store in a workpaper cell.
This inserts a value in Reference Codes, which is the actual value of the parameter sent to ONESOURCE applications.

- Select the following icon to copy the reference code to a workpaper cell:

- Enter the cell range addresses manually, or select the cells in the workpaper, and then select OK.

After you select the cell, the reference code disappears, and the cell address or name is inserted into the formula.
If the selected cell or range has a name, you receive an additional pop-up. Select Yes if you prefer to use cell or range name instead of the cell address.
If you refer to names of cells or cell ranges, the name appears in the field instead of the address. Also, the Anchoring check boxes disappear because anchoring is set automatically:
If you decide not to use a reference, select the keyboard icon
. - Do one of the following:
- Set up row and column anchors (see Select Component and Parameter Anchors below).
- Create references or select values for other parameters in Selected Parameters.
- Select Next and complete the remaining steps in the Function Wizard.
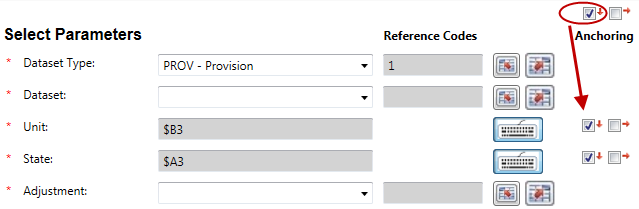
Select Component and Parameter Anchors
If you configured your parameter references using one of the methods above, you can also configure row and column anchors. Anchors are useful if you are copying formulas to other cells and want your copied formulas to refer to the same parameter cell, row, or column.
Skip the steps below if you refer to names of cells or cell ranges instead of addresses. The anchoring is set automatically for named cells or cell ranges.
To configure anchors:
- To anchor rows and/or columns for only certain parameters, select the appropriate Anchoring check boxes next to each parameter:
- Select the check box with the down arrow to anchor the column.
- Select the check box with the right arrow to anchor the row.
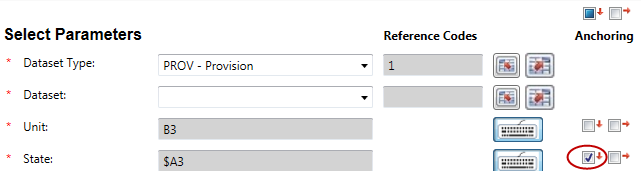
To anchor columns and/or rows for every parameter, select the check boxes at the top.
-
When you finish configuring references and anchors for these parameters, select Next, and complete the remaining steps in the Function Wizard: